
Requirements :
1) The animated background in a format that can be split into a sequence of frames (MP4, GIF........)
2) Software / site that can split the animation file into frames (photoshop, ezgif.com or anything that can get it done)
3) Backporter's TGA-PNG-JPG-TO DDS , you should read the setup instructions first then download the tool from the releases page
I recommend you put everything in a folder so you don't get confused, at the end of the tutorial I will be providing PKGs of the sample dynamic theme I've linked since we'll be using it as an example, and another dynamic theme that Backporter made just for good measure. You should know that because animated backgrounds differ in length and frame variety you might have to tune the following steps to give you a good result, this should involve some trial and error.
I started by using a freeware called Free Video to JPG Converter made by dvdvidesoft since it has a very important feature that allows you to specify the number of frames you want the animation to be split into (we will be using 31 frames in total), this is crucial because every frame has to be added to the index.xml file located in \sample theme\scene\background.raf as it controls what the PS4 is told to do with the frames otherwise the theme will either not work or do something funny. You could technically use as many frames as you want as long as the size of the background.raf folder is under 16 mb and that you code the extra frames in the index.xml file (that's a requirement otherwise the theme won't work and it'll just show the default XMB animation).
To keep it as user friendly as possible we'll just use 31 frames so we don't have to modify the code too much, after i got my 31 frames i had to rename them from 00.jpg to 30.jpg

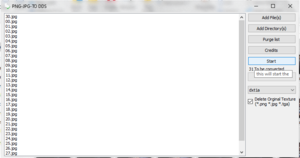
and then drop them in Backporter's tool, it supports drag and drop so just Ctrl+A and drag them into it (make sure the type is set to dxt1a and press start),

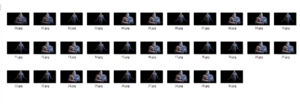
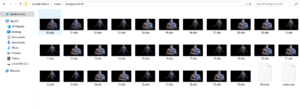
right now you should have 31 .dds files going from 00.dds to 30.dds if you've done everything correctly, put these in \sample theme\scene\background.raf and replace the ones from the sample theme, the folder should look the same as the original but with the new frames

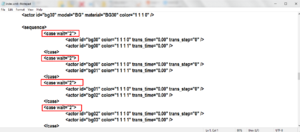
Unfortunately, 9/10 times you will have to edit the index.xml file to modify how fast the animations will be played and this is where the trial and error kicks in, what you're looking for is a bunch of lines that look like this:
<case wait="2">
They will be starting near the end of the file after the actors sequence, you want to modify the number in all of them (in our case 2) to a value that makes the animation play at a reasonable pace (not too fast and not too slow that it becomes noticeable), for this theme i chose 2, it depends on how different the frames are from each other, in Backporter's theme he used 0.04 as the animations weren't so different from each other, just experiment with it until you get something you're satisfied with.

That pretty much concludes what you need to do for the animated background part, when you get an animation that plays well everything else is identical to how you would make a static theme so you can follow Modded Warfare's tutorial for that:
TLDR Steps :
- Split the animation into 31 frames or more if you like overcomplicating things
- Use Backporter's tool to convert into .dds files and copy into the background.raf folder
- Trial and error with how fast the animation plays by modifying <case wait="?"> with a convenient number
- Finish customizing the theme with the static elements (music, icons....) with MW's tool
- Generate a random content id and pack the pkg
- Have fun
Here are 2 example themes:
Shoutout to Backporter, Bambi, yyoossk, BMT, Crazy Potato and PoeticRuins
1) The animated background in a format that can be split into a sequence of frames (MP4, GIF........)
2) Software / site that can split the animation file into frames (photoshop, ezgif.com or anything that can get it done)
3) Backporter's TGA-PNG-JPG-TO DDS , you should read the setup instructions first then download the tool from the releases page
You must click 'Like' before you can see the hidden data contained here
4) Backporter's Random Content ID Generator
You must click 'Like' before you can see the hidden data contained here
5) Modded Warfare's PS4 Theme Creator (it can create static custom themes so it will be used for everything except the animated background itself)
You must click 'Like' before you can see the hidden data contained here
6) Folder of a sample dynamic theme
You must click 'Like' before you can see the hidden data contained here
7) Something to make a param.sfo file and something to generate the PKG with (FPKG Tools, LibOrbisPKG.....)
I recommend you put everything in a folder so you don't get confused, at the end of the tutorial I will be providing PKGs of the sample dynamic theme I've linked since we'll be using it as an example, and another dynamic theme that Backporter made just for good measure. You should know that because animated backgrounds differ in length and frame variety you might have to tune the following steps to give you a good result, this should involve some trial and error.
I started by using a freeware called Free Video to JPG Converter made by dvdvidesoft since it has a very important feature that allows you to specify the number of frames you want the animation to be split into (we will be using 31 frames in total), this is crucial because every frame has to be added to the index.xml file located in \sample theme\scene\background.raf as it controls what the PS4 is told to do with the frames otherwise the theme will either not work or do something funny. You could technically use as many frames as you want as long as the size of the background.raf folder is under 16 mb and that you code the extra frames in the index.xml file (that's a requirement otherwise the theme won't work and it'll just show the default XMB animation).
To keep it as user friendly as possible we'll just use 31 frames so we don't have to modify the code too much, after i got my 31 frames i had to rename them from 00.jpg to 30.jpg
and then drop them in Backporter's tool, it supports drag and drop so just Ctrl+A and drag them into it (make sure the type is set to dxt1a and press start),
right now you should have 31 .dds files going from 00.dds to 30.dds if you've done everything correctly, put these in \sample theme\scene\background.raf and replace the ones from the sample theme, the folder should look the same as the original but with the new frames
Unfortunately, 9/10 times you will have to edit the index.xml file to modify how fast the animations will be played and this is where the trial and error kicks in, what you're looking for is a bunch of lines that look like this:
<case wait="2">
They will be starting near the end of the file after the actors sequence, you want to modify the number in all of them (in our case 2) to a value that makes the animation play at a reasonable pace (not too fast and not too slow that it becomes noticeable), for this theme i chose 2, it depends on how different the frames are from each other, in Backporter's theme he used 0.04 as the animations weren't so different from each other, just experiment with it until you get something you're satisfied with.
That pretty much concludes what you need to do for the animated background part, when you get an animation that plays well everything else is identical to how you would make a static theme so you can follow Modded Warfare's tutorial for that:
You must click 'Like' before you can see the hidden data contained here
- Split the animation into 31 frames or more if you like overcomplicating things
- Use Backporter's tool to convert into .dds files and copy into the background.raf folder
- Trial and error with how fast the animation plays by modifying <case wait="?"> with a convenient number
- Finish customizing the theme with the static elements (music, icons....) with MW's tool
- Generate a random content id and pack the pkg
- Have fun
Here are 2 example themes:
You must click 'Like' before you can see the hidden data contained here
Attachments
Last edited:
